Triggering failovers
Temporal Cloud automatically initiates failovers when an incident or outage affects a replicated Namespace. Standby Namespace replicas duplicate data and prevent data loss during failover.
- Triggering failovers
- Failover testing
- Failovers and Worker deployment
- Set up secure routing for failovers
Triggering failovers
Temporal automatically initiates failovers when an incident or outage affects a replicated Namespace. You can also trigger a failover based on your own custom alerts and for testing purposes. This section explains how to manually trigger a failover and what to expect afterward.
Always check the metric replication lag before initiating a failover. A forced failover when there is a large replication lag has a higher likelihood of rolling back Workflow progress.
Performing manual failovers
You can trigger a failover manually using the Temporal Cloud Web UI or the tcld CLI, depending on your preference and setup.
The following table outlines the steps for each method:
| Method | Instructions |
|---|---|
| Temporal Cloud Web UI | 1. Visit the Namespace page on the Temporal Cloud Web UI. 2. Navigate to your Namespace details page and select the Trigger a failover option from the menu. 3. After confirmation, Temporal initiates the failover. |
Temporal tcld CLI | To manually trigger a failover, run the following command in your terminal: tcld namespace failover \ --namespace <namespace_id>.<account_id> \ --region <target_region> Temporal fails over the Namespace to the target region. High availability Namespaces using a single region will failover to the standby isolation domain. |
Disabling Temporal-initiated failovers
When you add a replica to a Namespace, in the event of an incident or an outage Temporal Cloud automatically fails over the Namespace to its replica. This is the recommended and default option.
However if you prefer to disable Temporal-initiated failovers and handle your own failovers, you can do so by navigating to the Namespace detail page in Temporal Cloud. Choose the "Disable Temporal-initiated failovers" option.
If you prefer to disable Temporal-initiated failovers and handle your own failovers, you can do so by navigating to the Namespace detail page in Temporal Cloud. Choose the "Disable Temporal-initiated failovers" option.
Post-failover event information
After any failover, whether triggered by you or by Temporal, event information appears in both the Temporal Cloud Web UI (on the Namespace detail page) and in your audit logs.
The audit log entry for Failover uses the "operation": "FailoverNamespace" event.
After failover, the replica becomes active, taking over and the Namespace is active in the new isolation domain or region.
You don't need to monitor Temporal Cloud's failover response in real-time. Whenever there is a failover event, users with the Account Owner and Global Admin roles automatically receive an alert email.
Failbacks
After Temporal-initiated failovers, Temporal Cloud shifts Workflow Execution processing back to the original region or isolation zone that was active before the incident once the incident is resolved. This is called a "failback".
Failover testing
Microservices and external dependencies will fail at some point. Testing failovers ensures your app can handle these failures effectively. Temporal recommends regular and periodic failover testing for mission-critical applications in production. By testing in non-emergency conditions, you verify that your app continues to function even when parts of the infrastructure fail.
Dive deeper — Why test? [Toggle to Open]
Preparing Worker deployment
Enabling high availability for Namespaces doesn't require specific Worker configuration. The process is invisible to the Workers. When a Namespace fails over to the replica, the DNS redirection orchestrated by Temporal ensures that your existing Workers continue to poll the Namespace without interruption. More details are available in the Routing section.
-
When a Namespace fails over to a replica in a different region, Workers will be communicating cross-region. If your application can’t tolerate this latency, deploy a second set of Workers in this region or opt for a replica in the same region.
-
In case of a complete regional outage, Workers in the original region may fail alongside the original Namespace. To keep Workflows moving during this level of outage, deploy a second set of Workers to the secondary region.
When a Namespace fails over to a replica in a different region, Workers will be communicating cross-region. If your application can’t tolerate this latency, deploy a second set of Workers in this region or opt for a replica in the same region. In case of a complete regional outage, Workers in the original region may fail alongside the original Namespace. To keep Workflows moving during this level of outage, deploy a second set of Workers to the secondary region.
Set up secure routing for failovers
When using a high availability Namespace, the Namespace's DNS record <ns>.<acct>.<tmprl_domain> targets a regional DNS record in the format <region>.region.<tmprl_domain>.
Here, <region> is the currently active region for your Namespace.
Clients resolving the Namespace’s DNS record are directed to connect to the active region for that Namespace, thanks to the regional DNS record.
During failover, Temporal Cloud changes the target of the Namespace DNS record from one region to another. Namespace DNS records are configured with a 15 seconds TTL. Any DNS cache should re-resolve the record within this delay. As a rule of thumb, DNS reconciliation takes no longer than twice (2x) the TTL. Clients should converge to the newly targeted region within, at, most a 30-second delay.
PrivateLink routing
Some networking configuration is required for failover to be transparent to clients and workers when using PrivateLink. This section describes how to configure routing for multi-region Namespaces for PrivateLink customers only.
PrivateLink customers may need to change certain configurations for multi-region Namespace use. Routing configuration depends on networking setup and use of PrivateLink. You may need to:
- override a DNS zone; and
- ensure the network connectivity between the two regions.
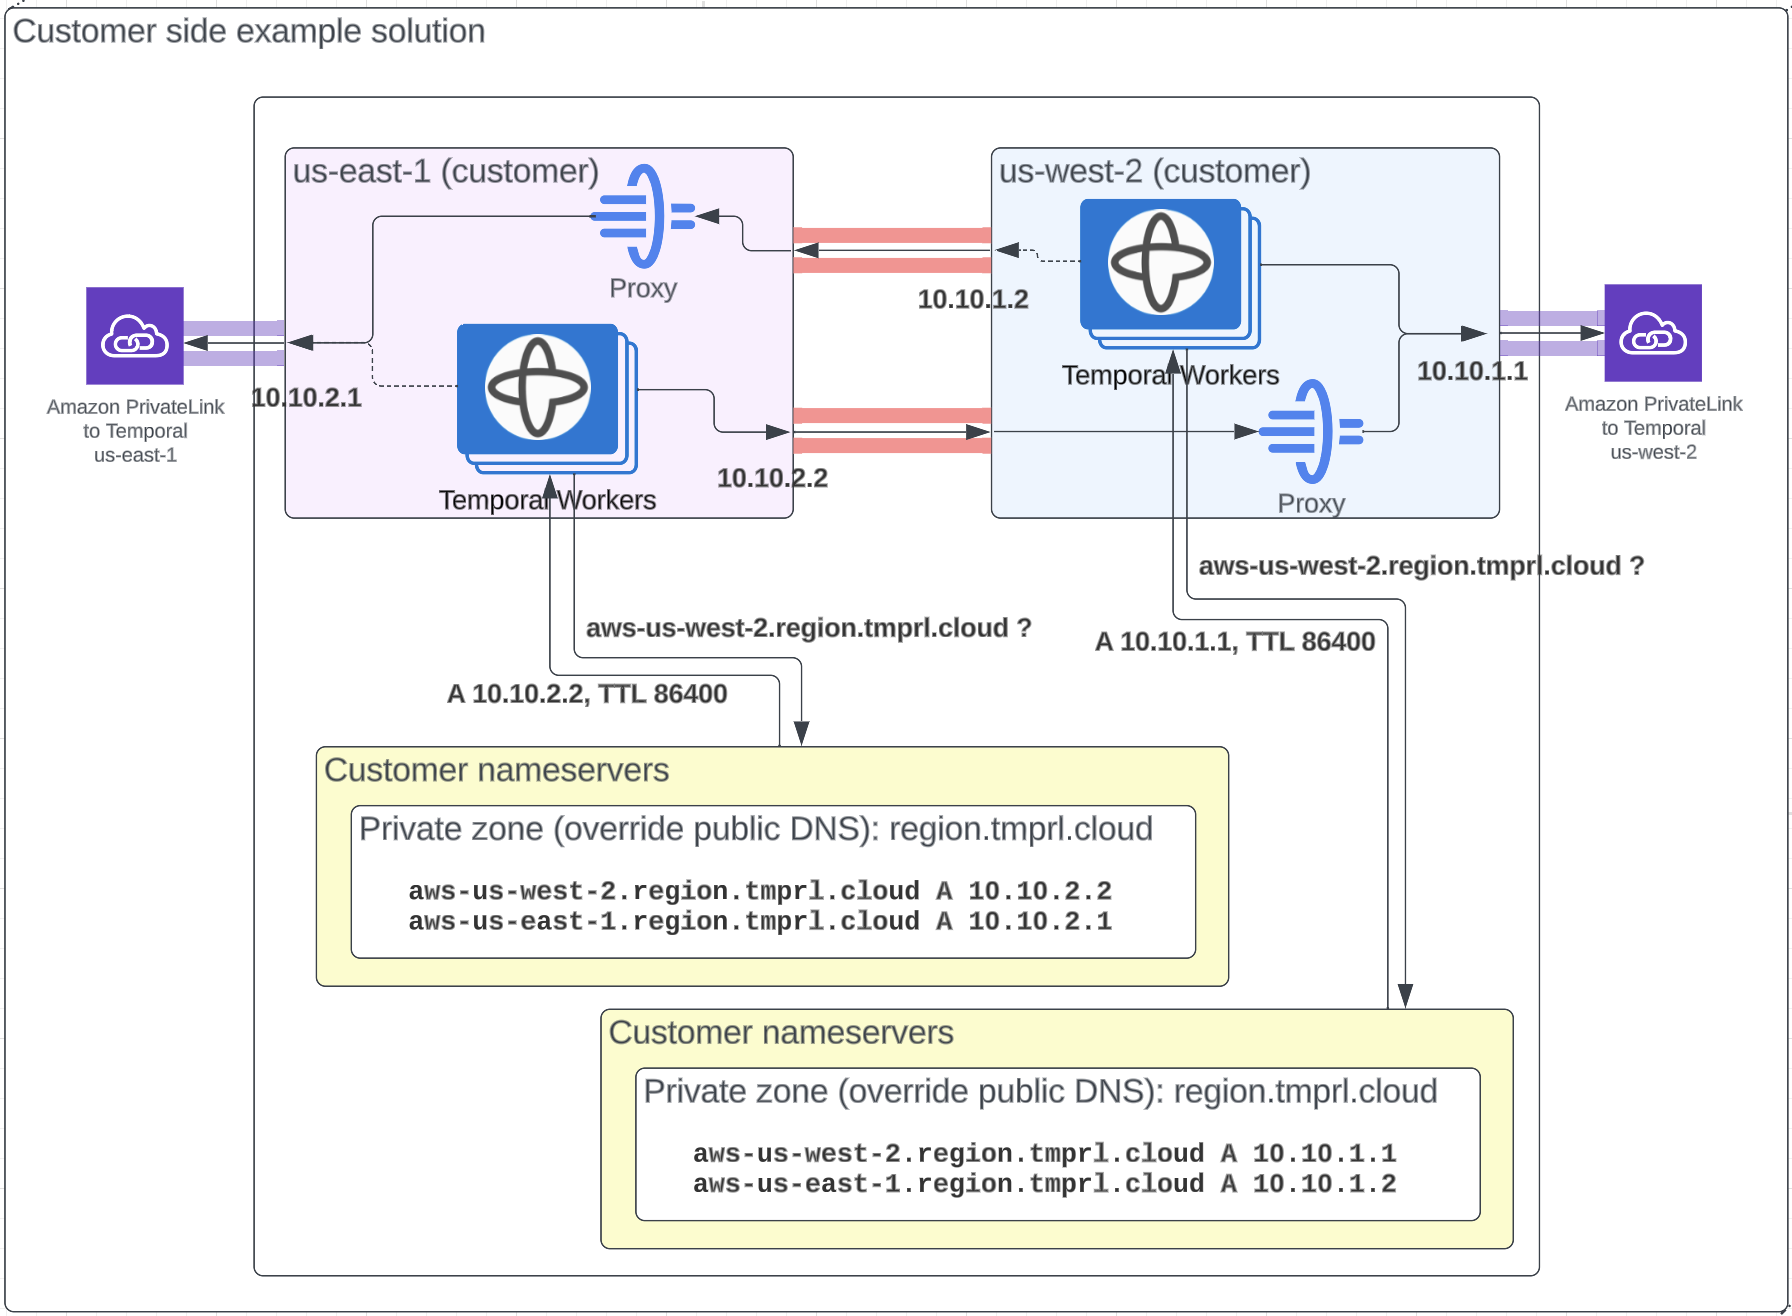
When using PrivateLink, you connect to Temporal Cloud using IP addresses local to your network.
The region.<tmprl_domain> zone is configured in the Temporal systems as an independent zone.
This allows you to override it to make sure traffic is routed internally for the regions in use.
You can check the Namespace's active region using the Namespace record CNAME, which is public.
To set up the DNS override, you override specific regions to target the relevant IP addresses (e.g. aws-us-west-1.region.tmprl.cloud to target 192.168.1.2).
Using AWS, this can be done using a private hosted zone in Route53 for region.<tmprl_domain>.
Link that private zone to the VPCs you use for Workers.
Private Link is not yet offered for GCP multi-region Namespaces.
When your Workers connect to the Namespace, they first resolve the <ns>.<acct>.<tmprl_domain> record.
This targets <active>.region.<tmprl_domain> using a CNAME.
Your private zone overrides that second DNS resolution, leading traffic to reach the internal IP you're using.
Consider how you'll configure Workers to run in this scenario. You might set Workers to run in both regions at all times. Alternately, you could establish connectivity between the regions to redirect Workers once failover occurs.
The following table lists Temporal's available regions, PrivateLink endpoints, and DNS record overrides.
The sa-east-1 region listed here is not yet available for use with multi-region Namespaces.
| Region | PrivateLink Service Name | DNS Record Override |
|---|---|---|
ap-northeast-1 | com.amazonaws.vpce.ap-northeast-1.vpce-svc-08f34c33f9fb8a48a | aws-ap-northeast-1.region.tmprl.cloud |
ap-northeast-2 | com.amazonaws.vpce.ap-northeast-2.vpce-svc-08c4d5445a5aad308 | aws-ap-northeast-2.region.tmprl.cloud |
ap-south-1 | com.amazonaws.vpce.ap-south-1.vpce-svc-0ad4f8ed56db15662 | aws-ap-south-1.region.tmprl.cloud |
ap-south-2 | com.amazonaws.vpce.ap-south-2.vpce-svc-08bcf602b646c69c1 | aws-ap-south-2.region.tmprl.cloud |
ap-southeast-1 | com.amazonaws.vpce.ap-southeast-1.vpce-svc-05c24096fa89b0ccd | aws-ap-southeast-1.region.tmprl.cloud |
ap-southeast-2 | com.amazonaws.vpce.ap-southeast-2.vpce-svc-0634f9628e3c15b08 | aws-ap-southeast-2.region.tmprl.cloud |
ca-central-1 | com.amazonaws.vpce.ca-central-1.vpce-svc-080a781925d0b1d9d | aws-ca-central-1.region.tmprl.cloud |
eu-central-1 | com.amazonaws.vpce.eu-central-1.vpce-svc-073a419b36663a0f3 | aws-eu-central-1.region.tmprl.cloud |
eu-west-1 | com.amazonaws.vpce.eu-west-1.vpce-svc-04388e89f3479b739 | aws-eu-west-1.region.tmprl.cloud |
eu-west-2 | com.amazonaws.vpce.eu-west-2.vpce-svc-0ac7f9f07e7fb5695 | aws-eu-west-2.region.tmprl.cloud |
sa-east-1 | com.amazonaws.vpce.sa-east-1.vpce-svc-0ca67a102f3ce525a | aws-sa-east-1.region.tmprl.cloud |
us-east-1 | com.amazonaws.vpce.us-east-1.vpce-svc-0822256b6575ea37f | aws-us-east-1.region.tmprl.cloud |
us-east-2 | com.amazonaws.vpce.us-east-2.vpce-svc-01b8dccfc6660d9d4 | aws-us-east-2.region.tmprl.cloud |
us-west-2 | com.amazonaws.vpce.us-west-2.vpce-svc-0f44b3d7302816b94 | aws-us-west-2.region.tmprl.cloud |